OpenCV vs ImageMagick
Jul 11, 2021
Before we begin this comparison, I would like to share the I have used both libraries in production apps where thousands of users utilized features built on top of these libraries.
Background
Back in 2018, when I joined Quixel I was tasked with building an image processor that can resize images, change image formats, channel pack textures, and gamma correct images. After discussing with other engineers we decided to use ImageMagick because it supports all the platforms that we ship Quixel Bridge on i.e. Windows, Mac, and Linux (Ubuntu/Cent).
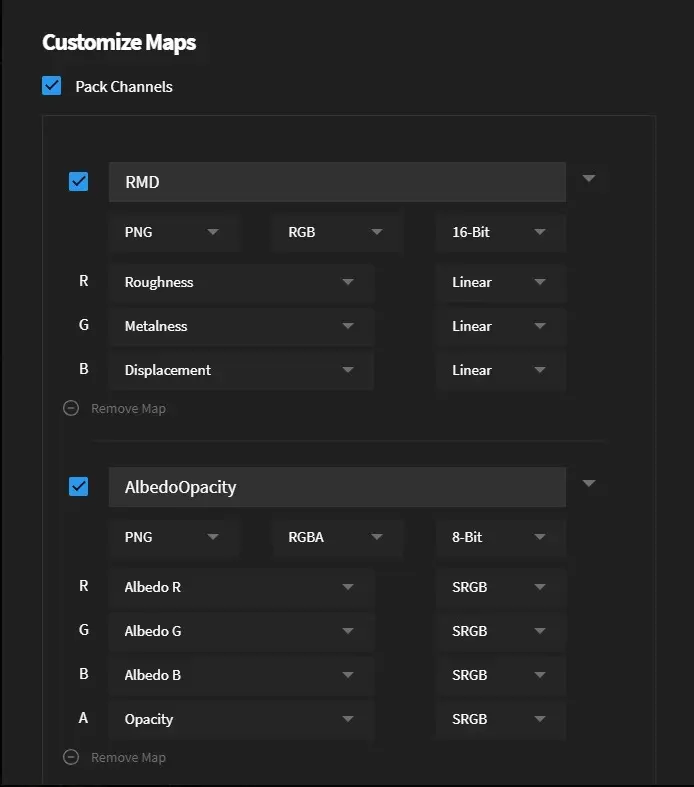
Channel packing is widely used in games due to its optimization benefits. We don't have to sample separate textures for the data that they carry e.g. In the screenshot below we are channel packing Roughness, Metalness, and Displacement texture into a single file because all three of these are grayscale textures (contains the same data in RGB channels).
ImageMagick - Quixel Bridge Image Processor V1
ImageMagick is a really big time saver and it was straightforward to start using it to manipulate images. We didn't run into any issues shipping the ImageMagick binary with Quixel Bridge except for Mac OS where we had to use an older version of ImageMagick and sign the binary manually.
The biggest challenge was channel packing textures with ImageMagick since we cannot hold extracted channels in the memory to merge them later so we had to extract the channel and write the data to a temporary file. Read/Write operations did add to the whole processing time and on top of that imagemagick is not the fastest library out there.
You might use ImageMagick if
You are building a prototype.
Development speed matters to you.
You want an out-of-the-box solution for multiple platforms.
You might not use ImageMagick if
You want full control over image manipulation.
Channel pack textures fast.
You want to play with 32-bit depth (HDR) images.
It took us about two months to fully integrate it in Bridge (this includes time to design/implement frontend and testing of this feature.) and it could handle the following tasks:
Channel pack textures.
Apply gamma correction.
Resize images.
Convert 16-bit textures to 8-bit textures.
Convert between the following formats: JPG/PNG/TGA/TIFF.
OpenCV- Quixel Bridge Image Processor V2
Pretty soon everyone realized that we need something that could process textures really fast and support more formats like EXR and 32-bit depth textures. I was tasked to research this a little bit and I was mainly considering two libraries i.e. FreeImage and OpenCV. FreeImage is being used in Quixel Mixer so I knew it can handle everything that we want but it was not as flexible as OpenCV.
After some initial tests, I proposed that we use OpenCV to build a standalone command-line tool and everyone liked the idea so we started building the second version of Image Processor using OpenCV / Python. I used OpenEXR to add the support for EXR images and Numpy to process textures super fast. Numpy really saved processing time e.g. Gamma correction on 8K texture was taking 33 seconds but numpy cut that time to less than 3 seconds which is bonkers.
Building binaries for Windows, Linux, and Mac presented some small challenges but we managed to overcome them easily.
You might use OpenCV if...
You are building a production app.
Processing speed matters to you.
You want full control over your image processing.
You want to easily channel pack textures.
You might not use OpenCV if...
You have limited time.
It took us about four months to fully integrate it in Bridge since we had to define each process carefully but if you ask me was it worth it. I would say yes because not only we added support for new features but it was 2x-8x faster compared to its ImageMagick counterpart. Since it is a command-line tool we started using it in the Megascans pipeline too.
It could handle the following tasks:
Channel pack textures.
Apply gamma correction.
Resize images.
Convert between following bit depth: 8/16/32-bit.
Convert between the following formats: JPG/PNG/TGA/TIFF/EXR.
Conclusion
OpenCV demands a little more time but it is worth it. ImageMagick is also a good library and you can ship really fast using it but unless you spend some time optimizing its source code it is not a viable option for production apps.

